

Install on Braintree
Connect your Braintree account to Rekomi natively, point a Braintree webhook at Rekomi and paste your API credentials, so recurring sales and chargebacks are tracked automatically with no backend relay.

Braintree (a PayPal company) is a payment gateway. Rekomi integrates with Braintree natively for subscriptions: you point a Braintree webhook destination at Rekomi and paste read-only API credentials, and every recurring charge is verified and recorded automatically, with no backend relay to build. Still evaluating? See Why Rekomi for Braintree →.
A note on scope, stated plainly: Braintree only fires webhooks for subscriptions and disputes, not for one-time card sales or card refunds (that is a Braintree limitation, not a Rekomi one). So this native flow tracks recurring revenue and claws back on chargebacks automatically. For one-time sales, use the server-to-server API; one-time card refunds are handled by denying the commission manually.
Attribution has two halves: the Rekomi script captures the affiliate click on your marketing pages, and you carry that referral into Braintree on a custom field. When Braintree sends the charge to Rekomi, the referral on the transaction is matched to the affiliate.
Not on a recurring Braintree plan? Use the server-to-server API instead, that path relays conversions from your own backend for any checkout.
1. Install the head script
Paste the Rekomi head script in your marketing site's <head>, on every page that can lead to a purchase, so the click is captured before the buyer reaches checkout.
<script async src="https://api.rekomi.com/api/v1/r/loader.js" data-program-id="YOUR_PROGRAM_ID" data-rkmi-email-capture="auto"></script>On a no-code builder (Webflow, Framer, Squarespace, etc.), use the platform's custom head-code field. Your program ID is in the dashboard under Settings, Tracking, Website snippet (the install hub).
Rekomi records an email a referred visitor types into any email or text field on the pages where the tag runs (signup, login, checkout and other forms) so the sale can be credited even when your checkout passes no referral. Nothing is recorded without a referral. Remove the data-rkmi-email-capture attribute to turn this off; explicit Rekomi.convert() calls still work.
2. Create the referral custom field
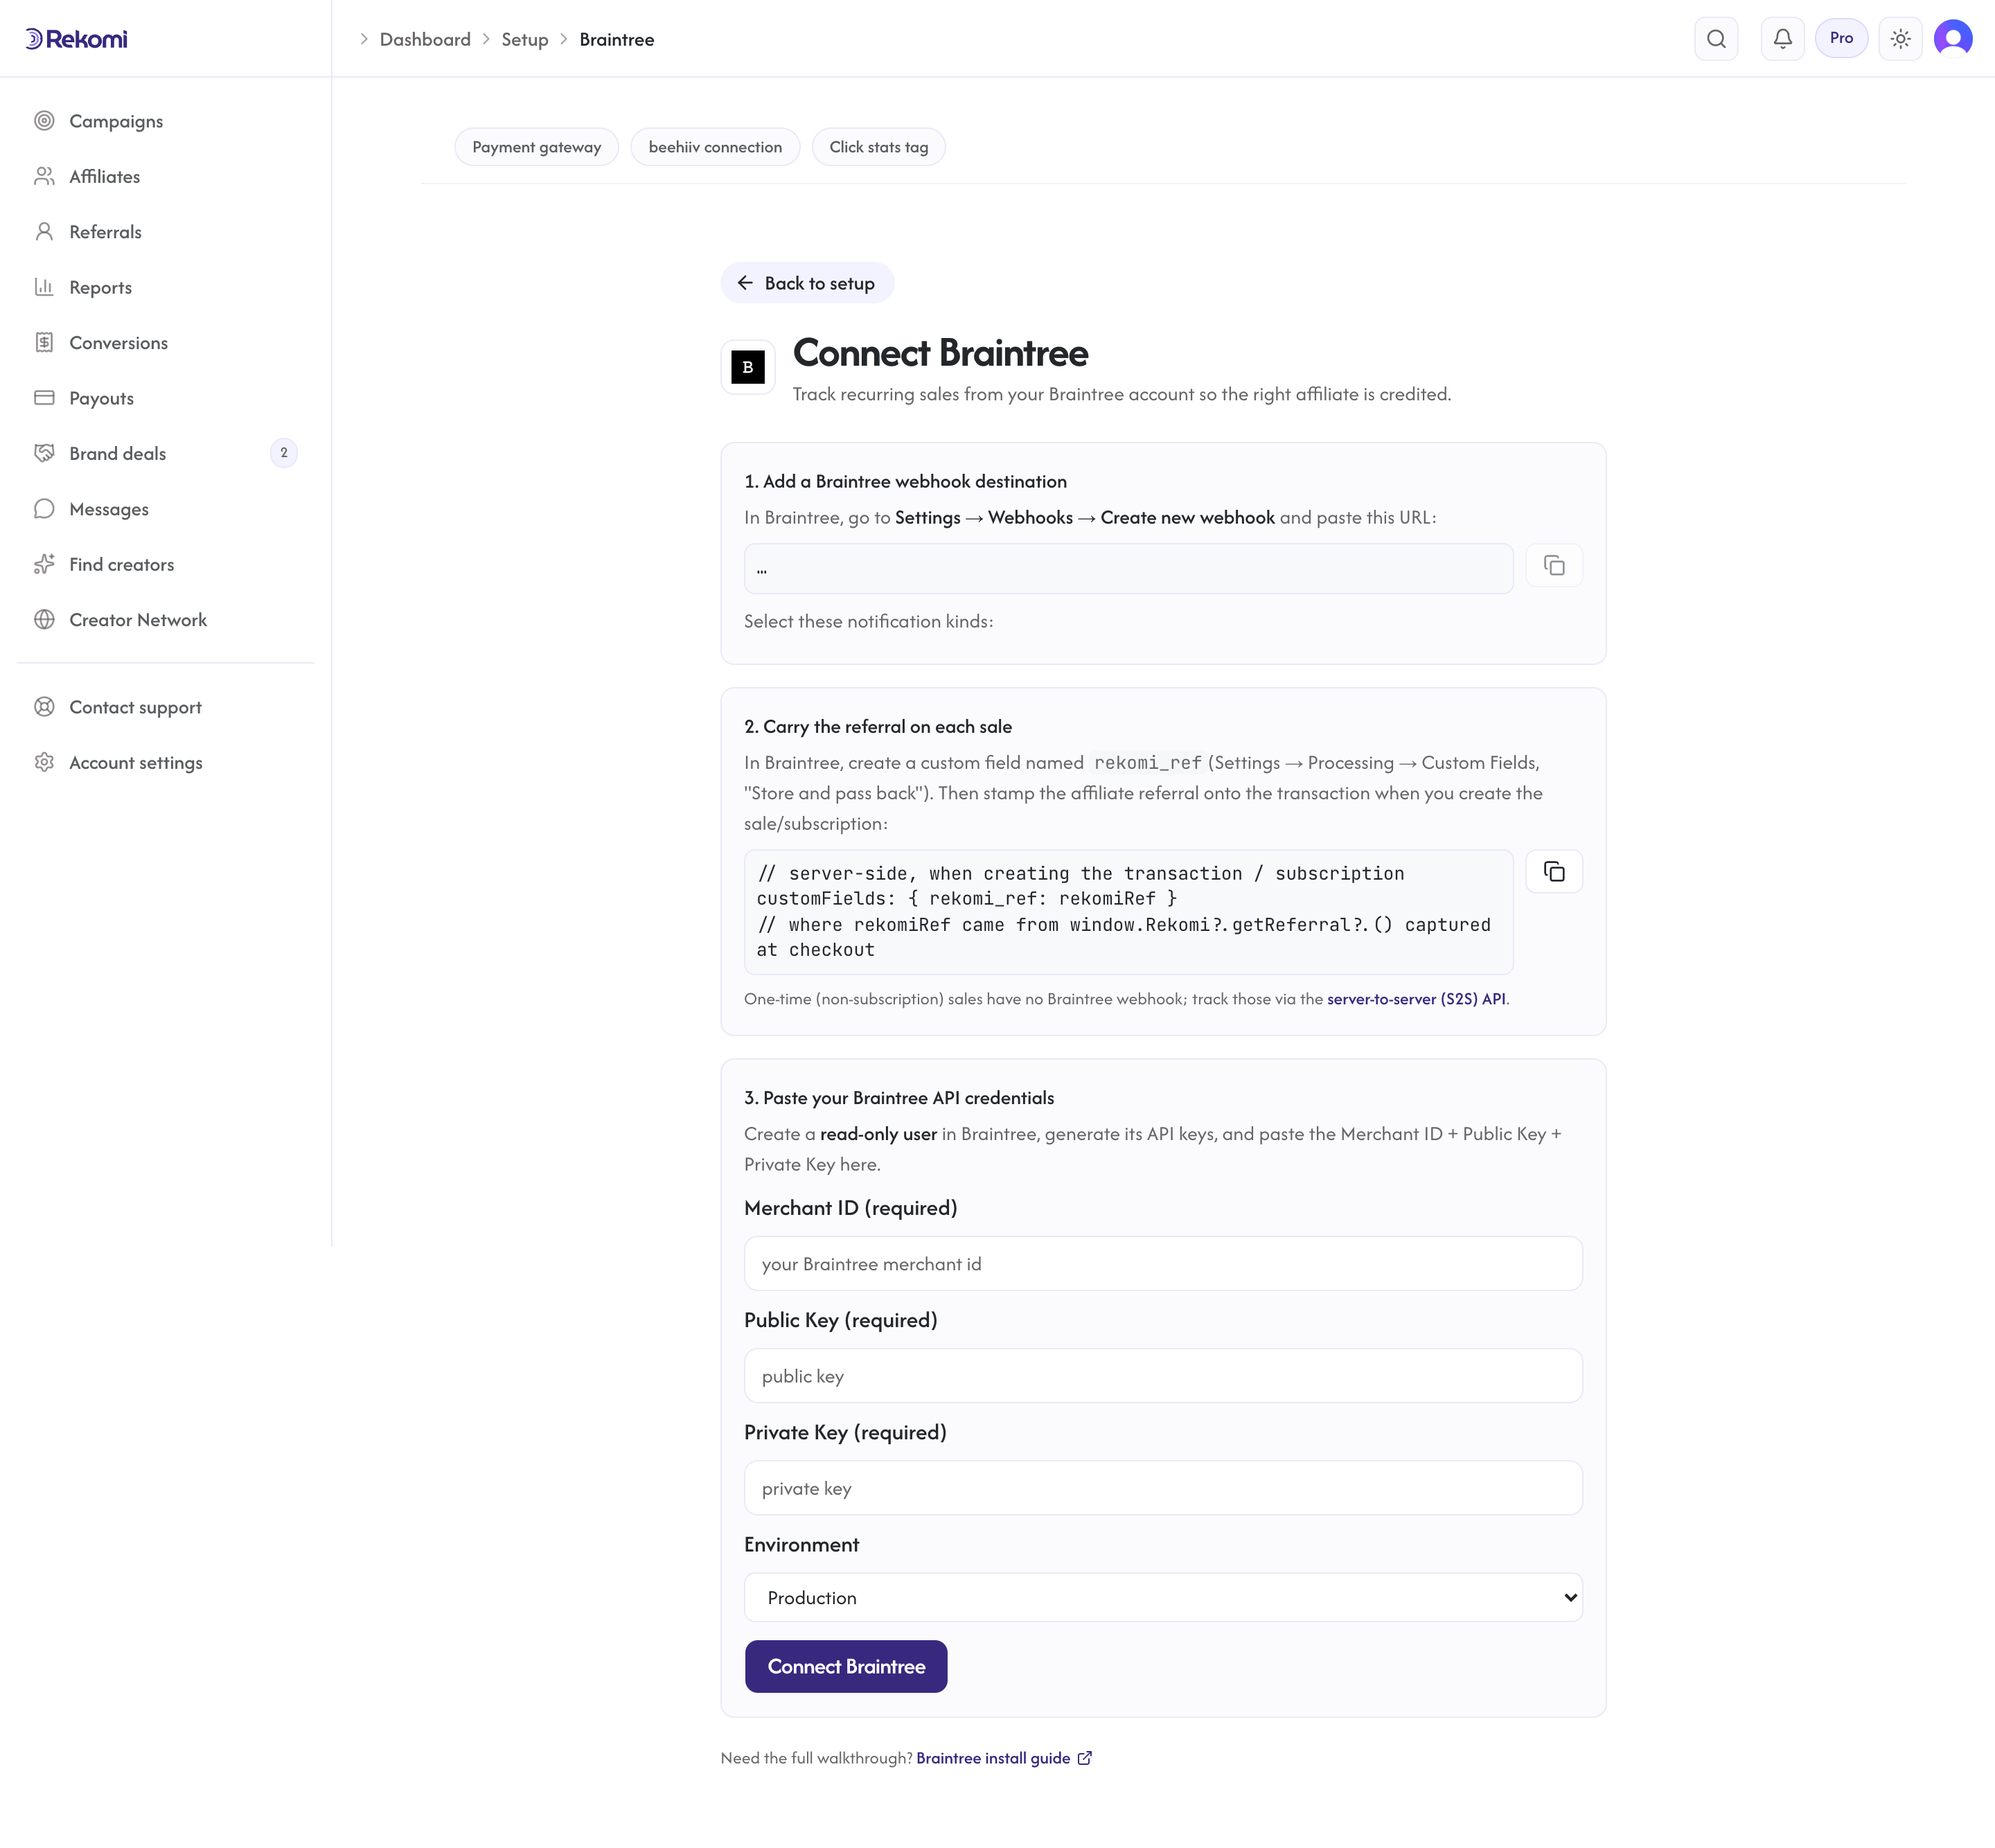
In the Braintree Control Panel, go to Settings → Processing → Custom Fields and add a custom field with the API name rekomi_ref, set to Store and pass back. This is the field that carries the affiliate's link slug onto each sale.
Then, when your backend creates the first transaction for the sale, stamp the referral you captured at checkout onto that transaction's custom field:
// the referral is the affiliate's link slug, captured client-side at checkout
const rekomiRef = window.Rekomi && window.Rekomi.getReferral();

// pass it to your backend, then set it on the transaction:
//   customFields: { rekomi_ref: rekomiRef }
The custom field name must be exactly rekomi_ref. Rekomi reads it off the transaction that Braintree delivers on the subscription webhook.
Lead email match (fallback). When a subscription charge reaches Rekomi without rekomi_ref on the transaction and the transaction carries the buyer's email, Rekomi also checks that email against the leads the Rekomi script captured on your own site in the last 90 days (turn on email capture on your signup form with data-rkmi-email-capture="auto" on the loader tag; see lead tracking) and credits the affiliate who brought that lead. The custom field always wins when it is present, as does the customer's earlier history on later charges, and an affiliate buying with their own email is not credited.
3. Get your Rekomi webhook URL
In Rekomi, open Setup, choose Connect payment gateway, and click Connect Braintree. Rekomi shows a webhook URL unique to your workspace, for example:
https://api.rekomi.com/api/webhooks/braintree/<your-token>Copy it. This URL is unique to you and is how Rekomi knows which workspace an event belongs to. Keep it private.
4. Create the Braintree webhook destination
In Braintree, go to Settings → Webhooks → Create new webhook and paste the Rekomi webhook URL. Select these notification kinds:
subscription_charged_successfullysubscription_canceledsubscription_expiredsubscription_went_past_duesubscription_charged_unsuccessfullydispute_openeddispute_lostdispute_wondispute_accepted
Save the webhook. Braintree may send a check notification to validate the URL; Rekomi acknowledges it automatically.
5. Paste your API credentials into Rekomi
Create a dedicated read-only user in Braintree (Account, Users) and generate that user's API keys. Read access is all Rekomi needs; make sure the user can view plans, which is what Rekomi reads to validate the keys. Back in Connect Braintree, paste the Merchant ID, Public Key, and Private Key, choose your environment (Production or Sandbox), and click Connect Braintree.
Your keys are validated against Braintree on connect, stored encrypted, and never shown again. From now on, every recurring charge carrying a rekomi_ref is credited to the right affiliate automatically.
Refunds and disputes
Chargebacks are handled automatically: when Braintree sends a dispute_lost event, Rekomi reverses the commission proportionally and updates the affiliate's pending balance.
Voluntary refunds of one-time card sales do not generate a Braintree webhook (a Braintree limitation), so those are handled by denying the affiliate's commission manually from the conversion. Recurring subscription churn (cancel / expire) is tracked automatically.
Quirks worth knowing
The referral lives on the transaction, not the subscription. Braintree subscriptions have limited metadata, so the rekomi_ref custom field must be set on the transaction at sale time; Rekomi reads it from the charge transaction delivered with the subscription webhook, and returning customers are matched by history on later charges.
One-time sales use S2S. Braintree fires no webhook for one-time card sales, so track those through the server-to-server API.
One conversion source per workspace. Braintree Connect is mutually exclusive with Stripe (via the Rekomi app for Stripe), Paddle, Shopify, Lemon Squeezy, Chargebee, Polar, Recurly, Gumroad, Creem, Dodo Payments, Mollie, and the S2S API, so the same sale is never counted twice. Disconnect one before connecting another.
Troubleshooting
A Braintree subscription charge didn't show up in Rekomi. Check four things: the webhook destination includes subscription_charged_successfully, the charge transaction's rekomi_ref custom field carries the affiliate slug, the custom field is set to "Store and pass back" in your Control Panel, and the affiliate is Approved. Braintree's webhook log shows the delivery + Rekomi's response code for each event.
The webhook returns a 401. The stored API credentials are missing, wrong, or were rotated, so the Braintree SDK can't validate the webhook signature against your keys. Re-copy the Merchant ID + keys from your read-only user and reconnect. (A 404 instead means the webhook URL's token is stale, reconnect to get the current URL.)
The connection shows as broken in Rekomi. The API keys were rotated or the read-only user was removed. Re-create the user or re-copy the keys in Braintree, then reconnect on the Connect Braintree page.
Related
Install on Paddle
Connect your Paddle Billing account to Rekomi natively, point a Paddle notification destination at Rekomi and paste the signing secret, so sales and refunds are tracked automatically with no backend code.
Install on Shopify
Install the Rekomi Affiliate Marketing app from the Shopify App Store in one click. The manual Custom Pixel plus order-webhook path remains for stores that prefer not to install an app.