

Recruit affiliates
Three channels: public application page, direct invite (single or bulk email), and the curated network.
There are three ways to bring affiliates into your campaign: public application page, direct invite, and the curated Rekomi Network.
1. Public application page (fully shipped)
Every active campaign has a public application page on your free branded subdomain at https://{yourbrand}.rekomi.com/{your-slug} (your root subdomain serves your primary campaign). This is the primary channel for affiliate recruitment today, and it's free on every plan tier. The page shows:
- Your campaign name and description
- Commission type and value (transparent up front)
- Cookie window
- Attribution model
- A short application form
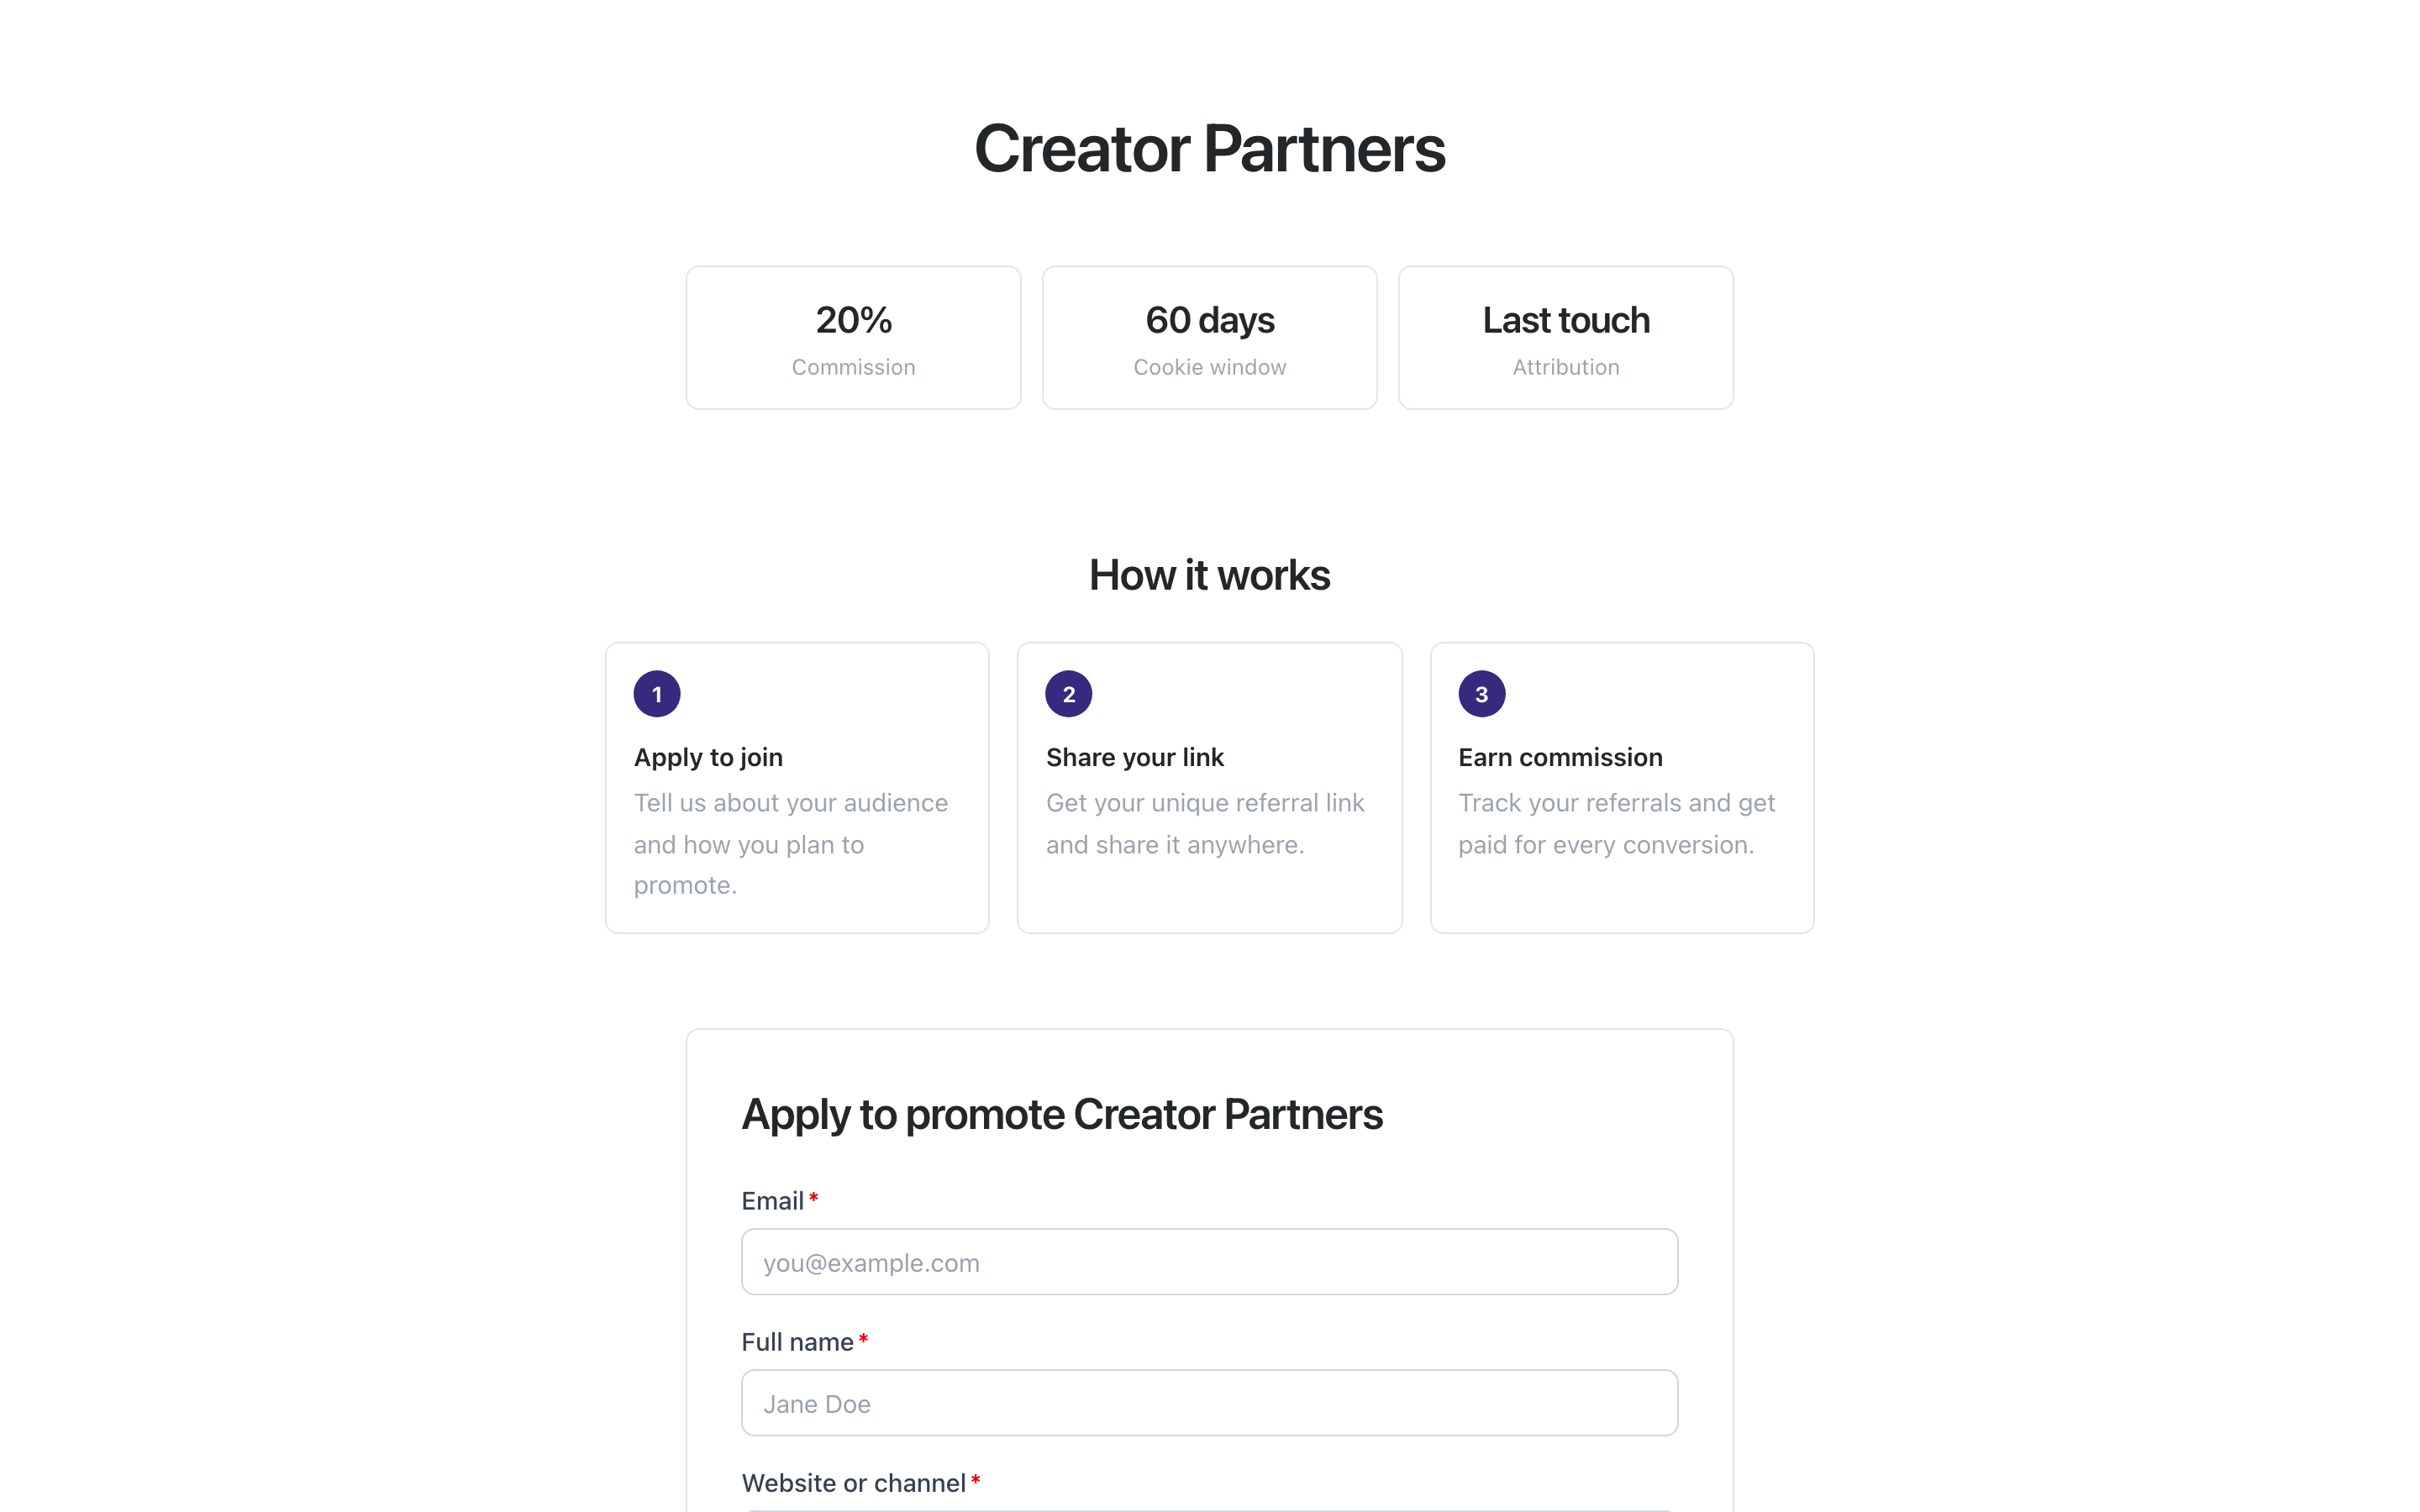
The page is fully customizable in the campaign's signup page editor. Open it with the Edit signup page button next to your signup page URL at the top of the campaign.
The application form itself is configured inside the editor. Out of the box it asks for email (required), full name, website or channel, and how the affiliate plans to promote you, with an Apply submit button whose text you can change. You can also add an optional custom alias field (3-64 letters, digits, or hyphens, with no leading or trailing hyphen) so affiliates pick their own link slug. You can add, remove, relabel, reorder, and mark fields required, choosing from 13 field types grouped as Text (text, long text, email, URL, number, date), Choice (dropdown, checkboxes, radio, a single consent checkbox), and Contact & location (phone with a flag/dial-code picker, country with the full ISO list, and a multi-part address). Submission creates a pending affiliate (or an approved one if you have autoApprove = true on the campaign); every answer is stored on the affiliate and shown on their detail page.
Custom fields are also the right way to collect extra data for your own automations, such as a promo code, a social handle, or an internal reference: add a new field with its own key rather than relabeling a built-in field for a different purpose. Every answer, custom fields included, is delivered on the affiliate.created and affiliate.approved webhooks (and the Zapier triggers built on them) as an applicationAnswers object keyed by your field keys, so an automation in Make, Zapier, or your CRM can read the value directly; see Webhooks. The full name answer in particular is reused across the product, in email greetings, payout receipts, and the full_name column of the US tax report export, so it should stay an actual name. Legal names for tax and payout purposes are always collected separately during payout setup (Stripe onboarding, or the affiliate's uploaded W-9/W-8), never from this form.
The form can also run as a two-step application. Turn on the toggle in the form editor and drag your questions between the two sections: step 1 asks only for name and email, and submitting it creates the applicant immediately, exactly like a normal application. The confirmation card then asks the step 2 questions inline, and the answers attach to the same application. If someone stops after step 1 you still keep the lead, and their profile notes that step 2 is unfinished. Applicants can skip step 2, so treat those questions as useful context rather than a gate.
The form editor also has a message while an application is under review field. On campaigns where you approve applications yourself, whatever you write there replaces the default text on the confirmation card an applicant sees right after submitting, so you can set expectations in your own words, for example how long a review usually takes. Applicants stay on that card until they choose to continue; nothing forwards them on a timer. Leave the field blank and the card shows the default copy, which asks the applicant to enter the code we email them so they can open their dashboard and follow the application. On pages where you have turned the "Powered by Rekomi" footer off, the card never mentions Rekomi in either case.
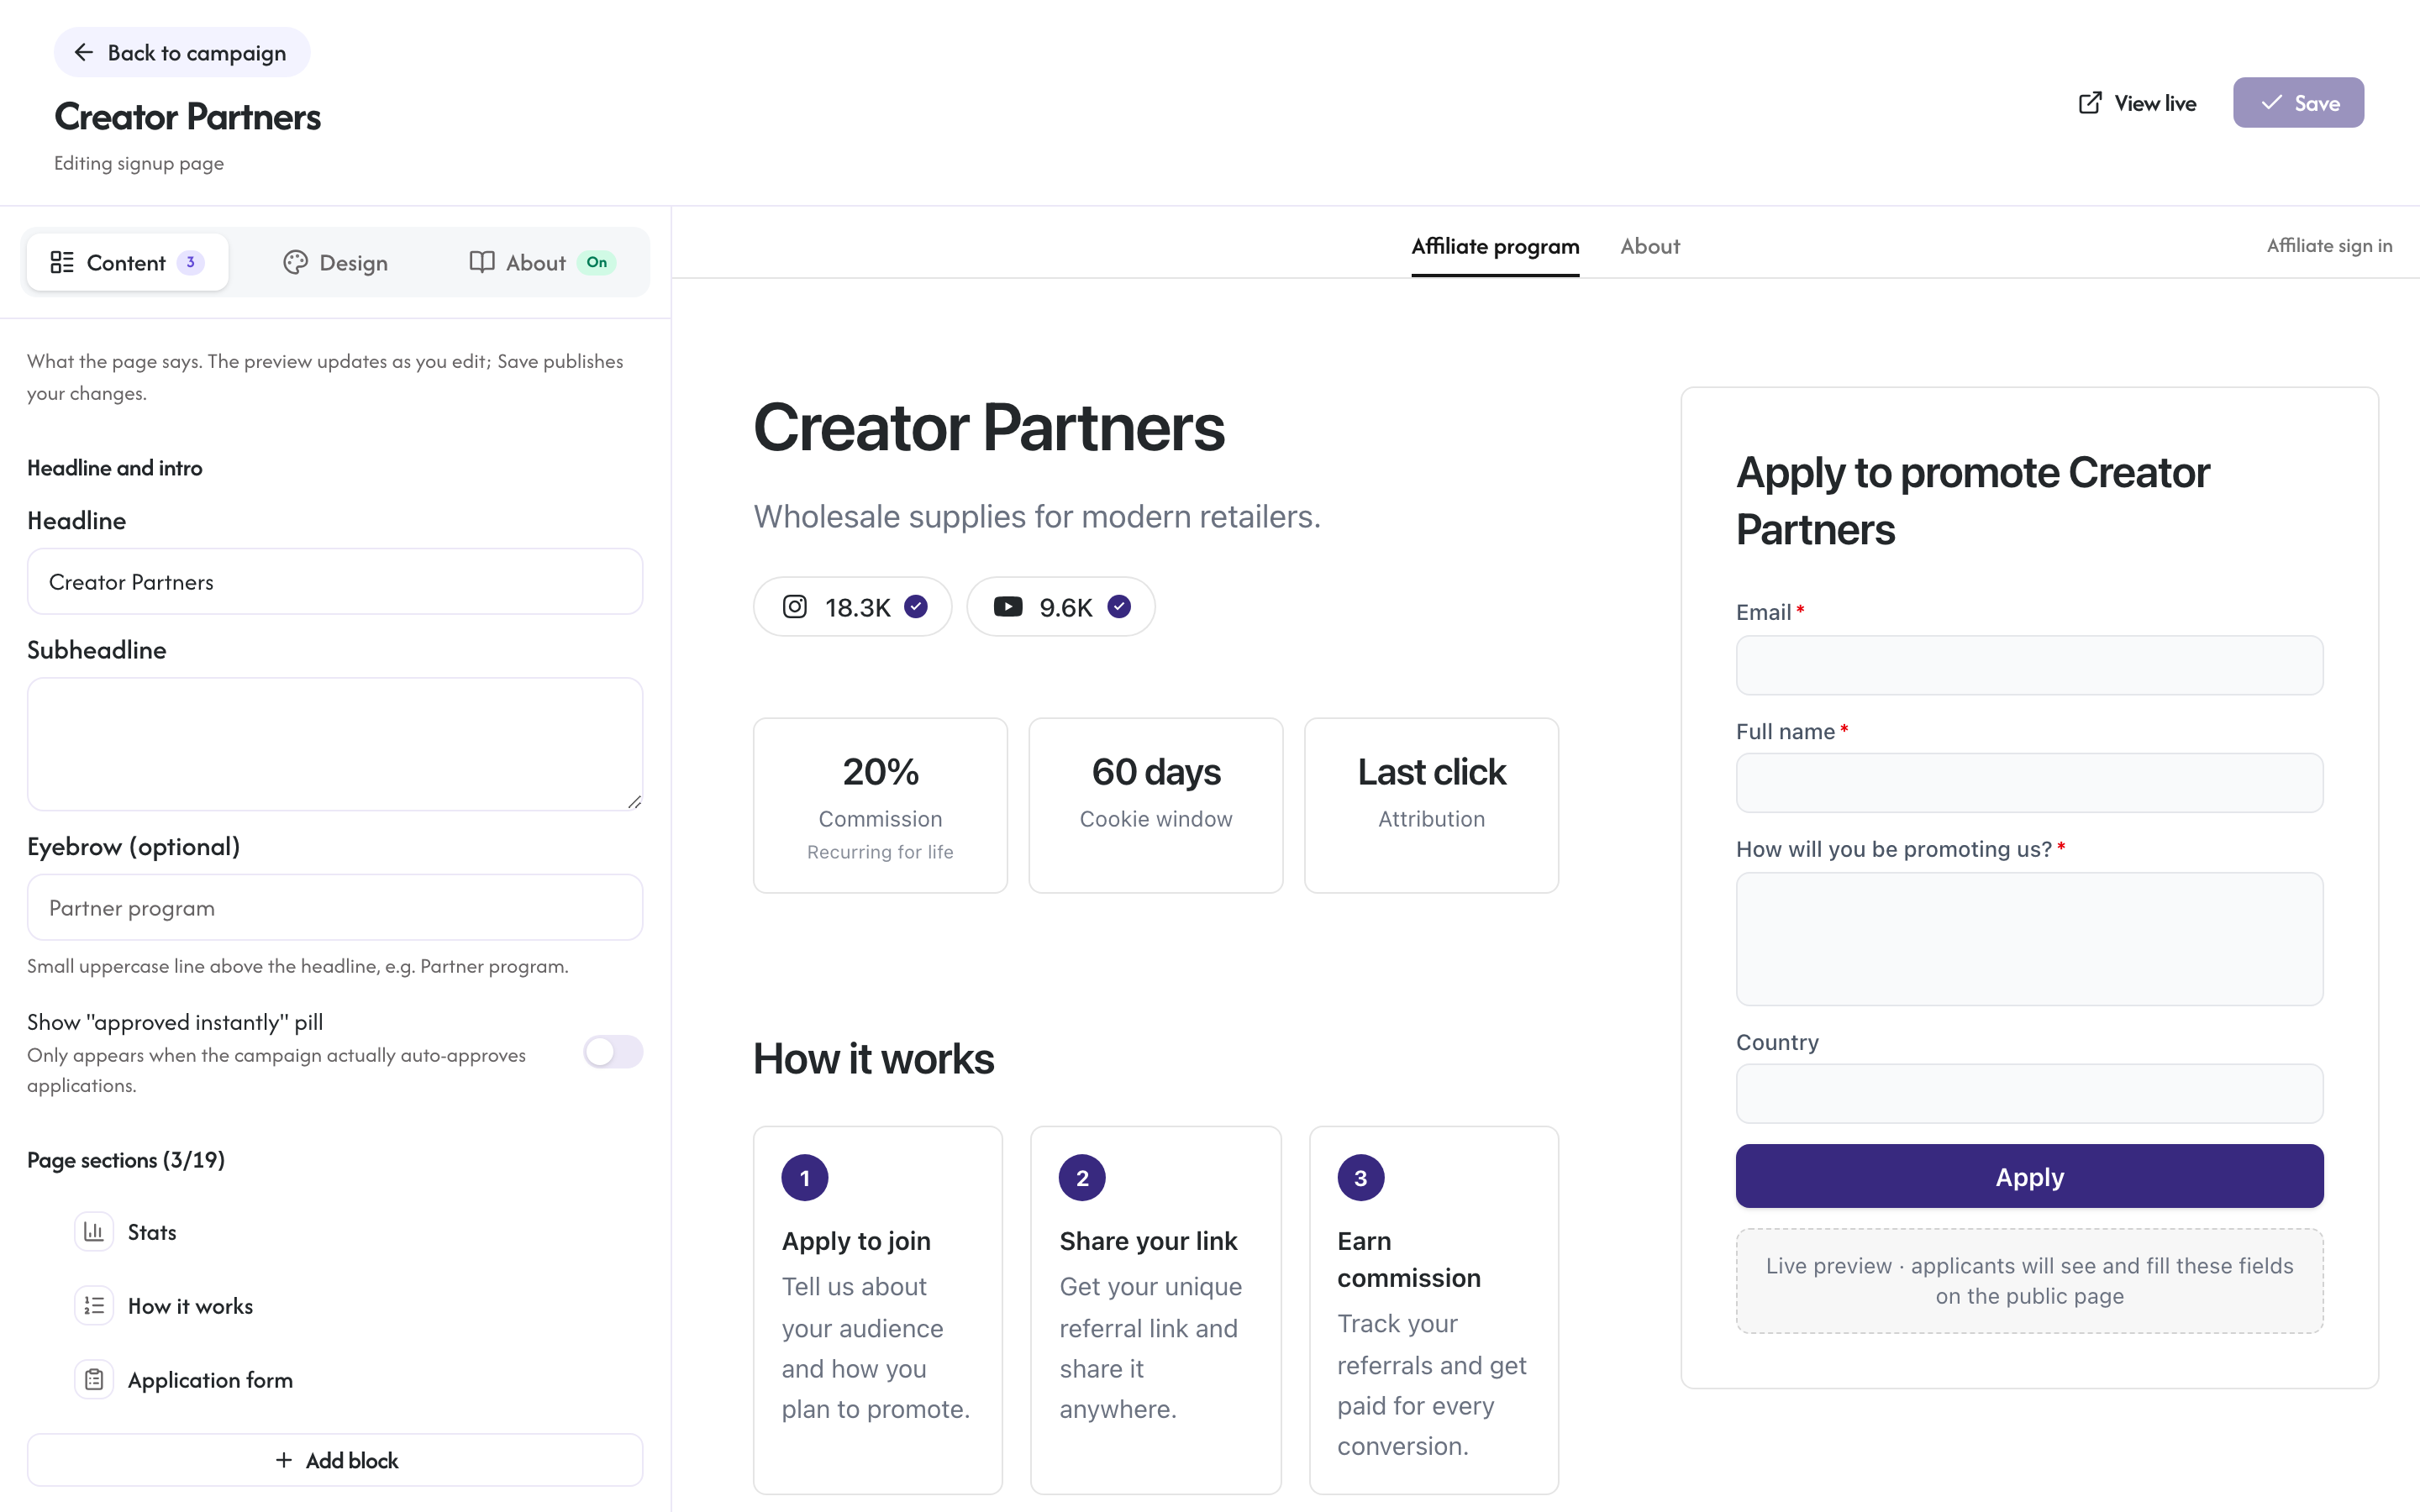
Beyond the form, the editor's Content tab also holds the Campaign URL group, where you can rename the page's URL slug (the old path redirects to the new one automatically). And the editor controls the whole page design:
- Layout: pick from Centered (a classic single column), Split (your pitch beside a sticky application form), Hero (a full-width banner in your accent color behind the headline), or Showcase (a full-height brand image beside the page, with your program's key numbers in a benefits card).
- Theme: start from a one-click preset, including dark palettes, then fine-tune the accent, body text, muted text, and page background colors. Choose from 1,900+ Google Fonts, set a background image with a readability overlay, and shape button and field corners.
- Content blocks: stats (live commission, cookie window, and attribution values), how-it-works steps, rich text, FAQ, images, testimonials, a Product showcase (up to 6 products, each with an optional photo, price text, and link; only the name is required), and extra call-to-action buttons. The hero supports an eyebrow line above the headline and an "approved instantly" pill that only appears when the campaign actually auto-approves. Don't confuse this Product showcase block with the Showcase page layout above; the layout is the whole-page structure, the block is one section you can add to any layout.
Every change previews live beside the editor, and nothing goes public until you click Save. The page footer carries a small "Powered by Rekomi" link; brands on Pro and Enterprise can turn it off in the editor's Footer section.
Share the URL anywhere: your homepage, your pricing page footer, Twitter, email lists, Product Hunt comments, your community.
Verified social pills
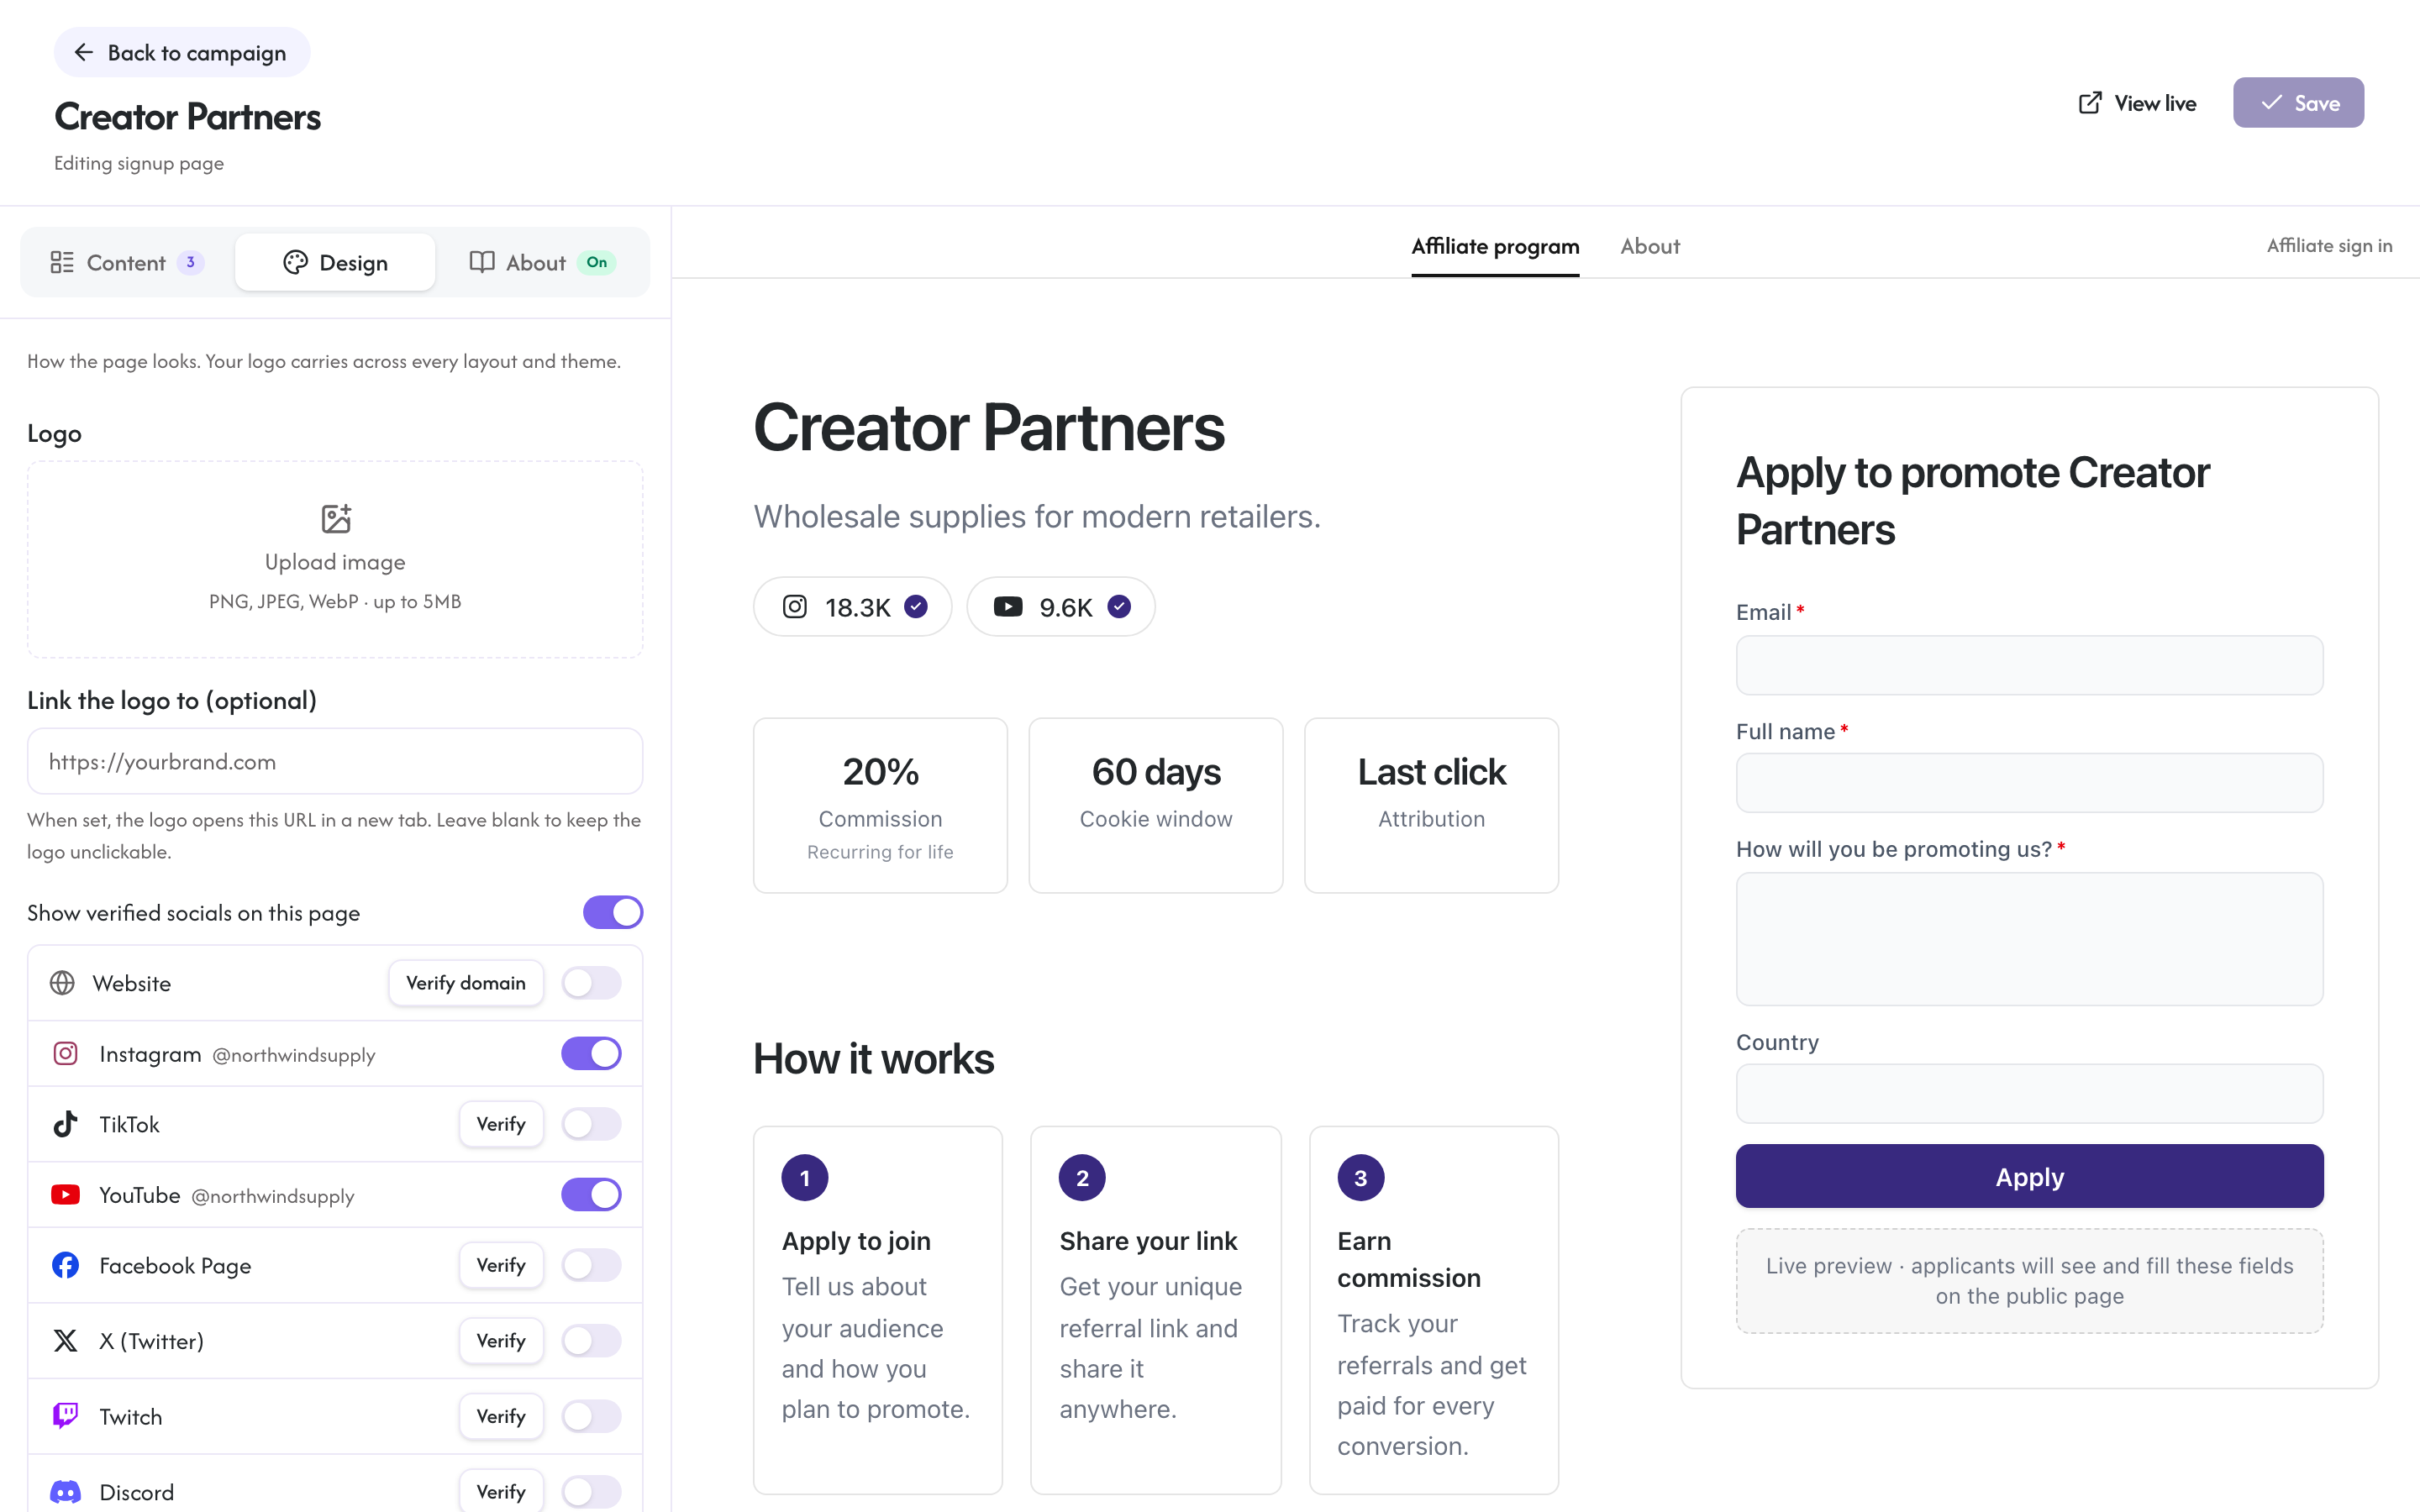
If you have connected your brand's social accounts in Settings, under Verified socials, the signup page shows them under the headline as verified pills: platform icon, live follower count, and a check mark. It is free social proof for applicants deciding whether your program is real. The pills appear on every layout, and the About page shows them too.
A website pill can join the row, and like every other pill it is verified, never self-reported. Brands using the Shopify, Wix, or BigCommerce app get it automatically: installing the app proves you control the store, and your platform already verified the store's domain, so the pill shows your store's own domain with nothing to set up (if you later claim a custom domain for your store, the pill upgrades by itself). Other brands unlock it by verifying a custom domain: that one DNS record proves you own the domain and serves your signup pages first-party, beyond the reach of ad blockers, so the same setup does both jobs. Either way, if the website in your organization profile lives on the proven domain, the pill links that exact address instead.
You control the pills per campaign from the page editor's Design tab, in the Brand section. "Show verified socials on this page" turns the whole row on or off, and under it each source (your website and every platform) gets its own toggle, so one campaign can show your main Instagram while another hides it. Social accounts you have not connected yet show a Verify button that takes you to Settings (inside the Shopify, Wix, and BigCommerce apps it opens the app's own Settings, then Verified socials). On the web dashboard, an unverified website row shows a Verify domain button into the custom domain flow; in the platform apps the website row is already verified with your store's domain. Once you finish verifying and come back, the row unlocks by itself (there is a Refresh button too). These toggles only affect that campaign's signup page. The About page always shows every connected account.
Track your signup page with your own pixels
If you drive paid or social traffic to your signup page, you can measure it in your own analytics and ad tools. The editor's Tracking pixels section takes IDs for five platforms, and each is just an ID, never a script:
- Google Analytics 4: the measurement ID from GA4 under Admin, then Data streams (looks like
G-ABC1DE23FG). - Google Ads: the conversion ID (looks like
AW-123456789) and, optionally, the conversion label, both from the tag setup of a conversion action under Goals, then Conversions. The label is case-sensitive, so paste it exactly. - Meta Pixel: the numeric pixel ID from Meta Events Manager.
- TikTok Pixel: the pixel code from TikTok Events Manager.
- LinkedIn Insight Tag: the numeric partner ID from Campaign Manager under Measure, then Signals manager, then Insight Tag (it shows under "I will use a tag manager"), and, optionally, the ID of an event-specific conversion from Measure, then Conversion tracking.
Paste an ID, save, and the public page starts loading that tag. Up to three events are reported: a page view, an "application started" event when a visitor begins filling in the form, and the conversion when they submit.
- GA4, Meta, and TikTok get all three. The conversion uses each platform's standard registration event (
sign_upon GA4,CompleteRegistrationon Meta and TikTok), so you can optimize ad delivery against real applications, not clicks. - Google Ads gets the page view, which feeds your remarketing lists, and, once you add the conversion label, the submitted application as that conversion action.
- LinkedIn gets the page view, which builds your retargeting audiences, and, once you add a conversion ID, the submitted application as that conversion.
Two things to know:
- Visitors see a consent banner. As soon as a tag is configured, the page shows a small cookie banner naming your brand. Tags only load after the visitor accepts; declining loads nothing at all, and a quiet "Cookie settings" link lets them change their mind later. Pages without tags never show a banner.
- Counts can sit below your Rekomi numbers. Visitors who decline (or block trackers) still apply just fine, but their page views and applications never reach your ad platform. Rekomi's own application counts are always complete.
IDs are validated when you save, so a typo fails loudly in the editor instead of silently never firing. A Google Ads conversion label or a LinkedIn conversion ID on its own is rejected too, because it can only fire alongside its platform's main ID. Each campaign's signup page carries its own tag settings, and the Integrations page (under Signup page tracking) lets you set one platform's IDs across every campaign in one place.
If autoApprove is true, the applicant gets an instant approval email with a "Get your link" magic-link CTA that signs them straight into /a on one click. Otherwise the application lands in your approval queue (see Manage affiliates) and the magic-link is generated after you approve.
2. Direct invite by email
Click Invite affiliates on the affiliates dashboard at /dashboard/affiliates. The modal accepts a single email or a bulk paste of up to 50 addresses, a campaign to invite them to, an optional rich-text personal note (bold, italic, link, paragraph, list), and an optional commission override. Single invites can also carry a tracking slug so a migrating affiliate keeps their existing link. A third tab, From customers, suggests likely referrers from your existing Stripe customers (Growth plan and above). Submission creates an invite per recipient and dispatches a branded email to each: single invites send immediately, and bulk pastes are queued by a background job that sends at a steady rate so nothing trips email rate limits.
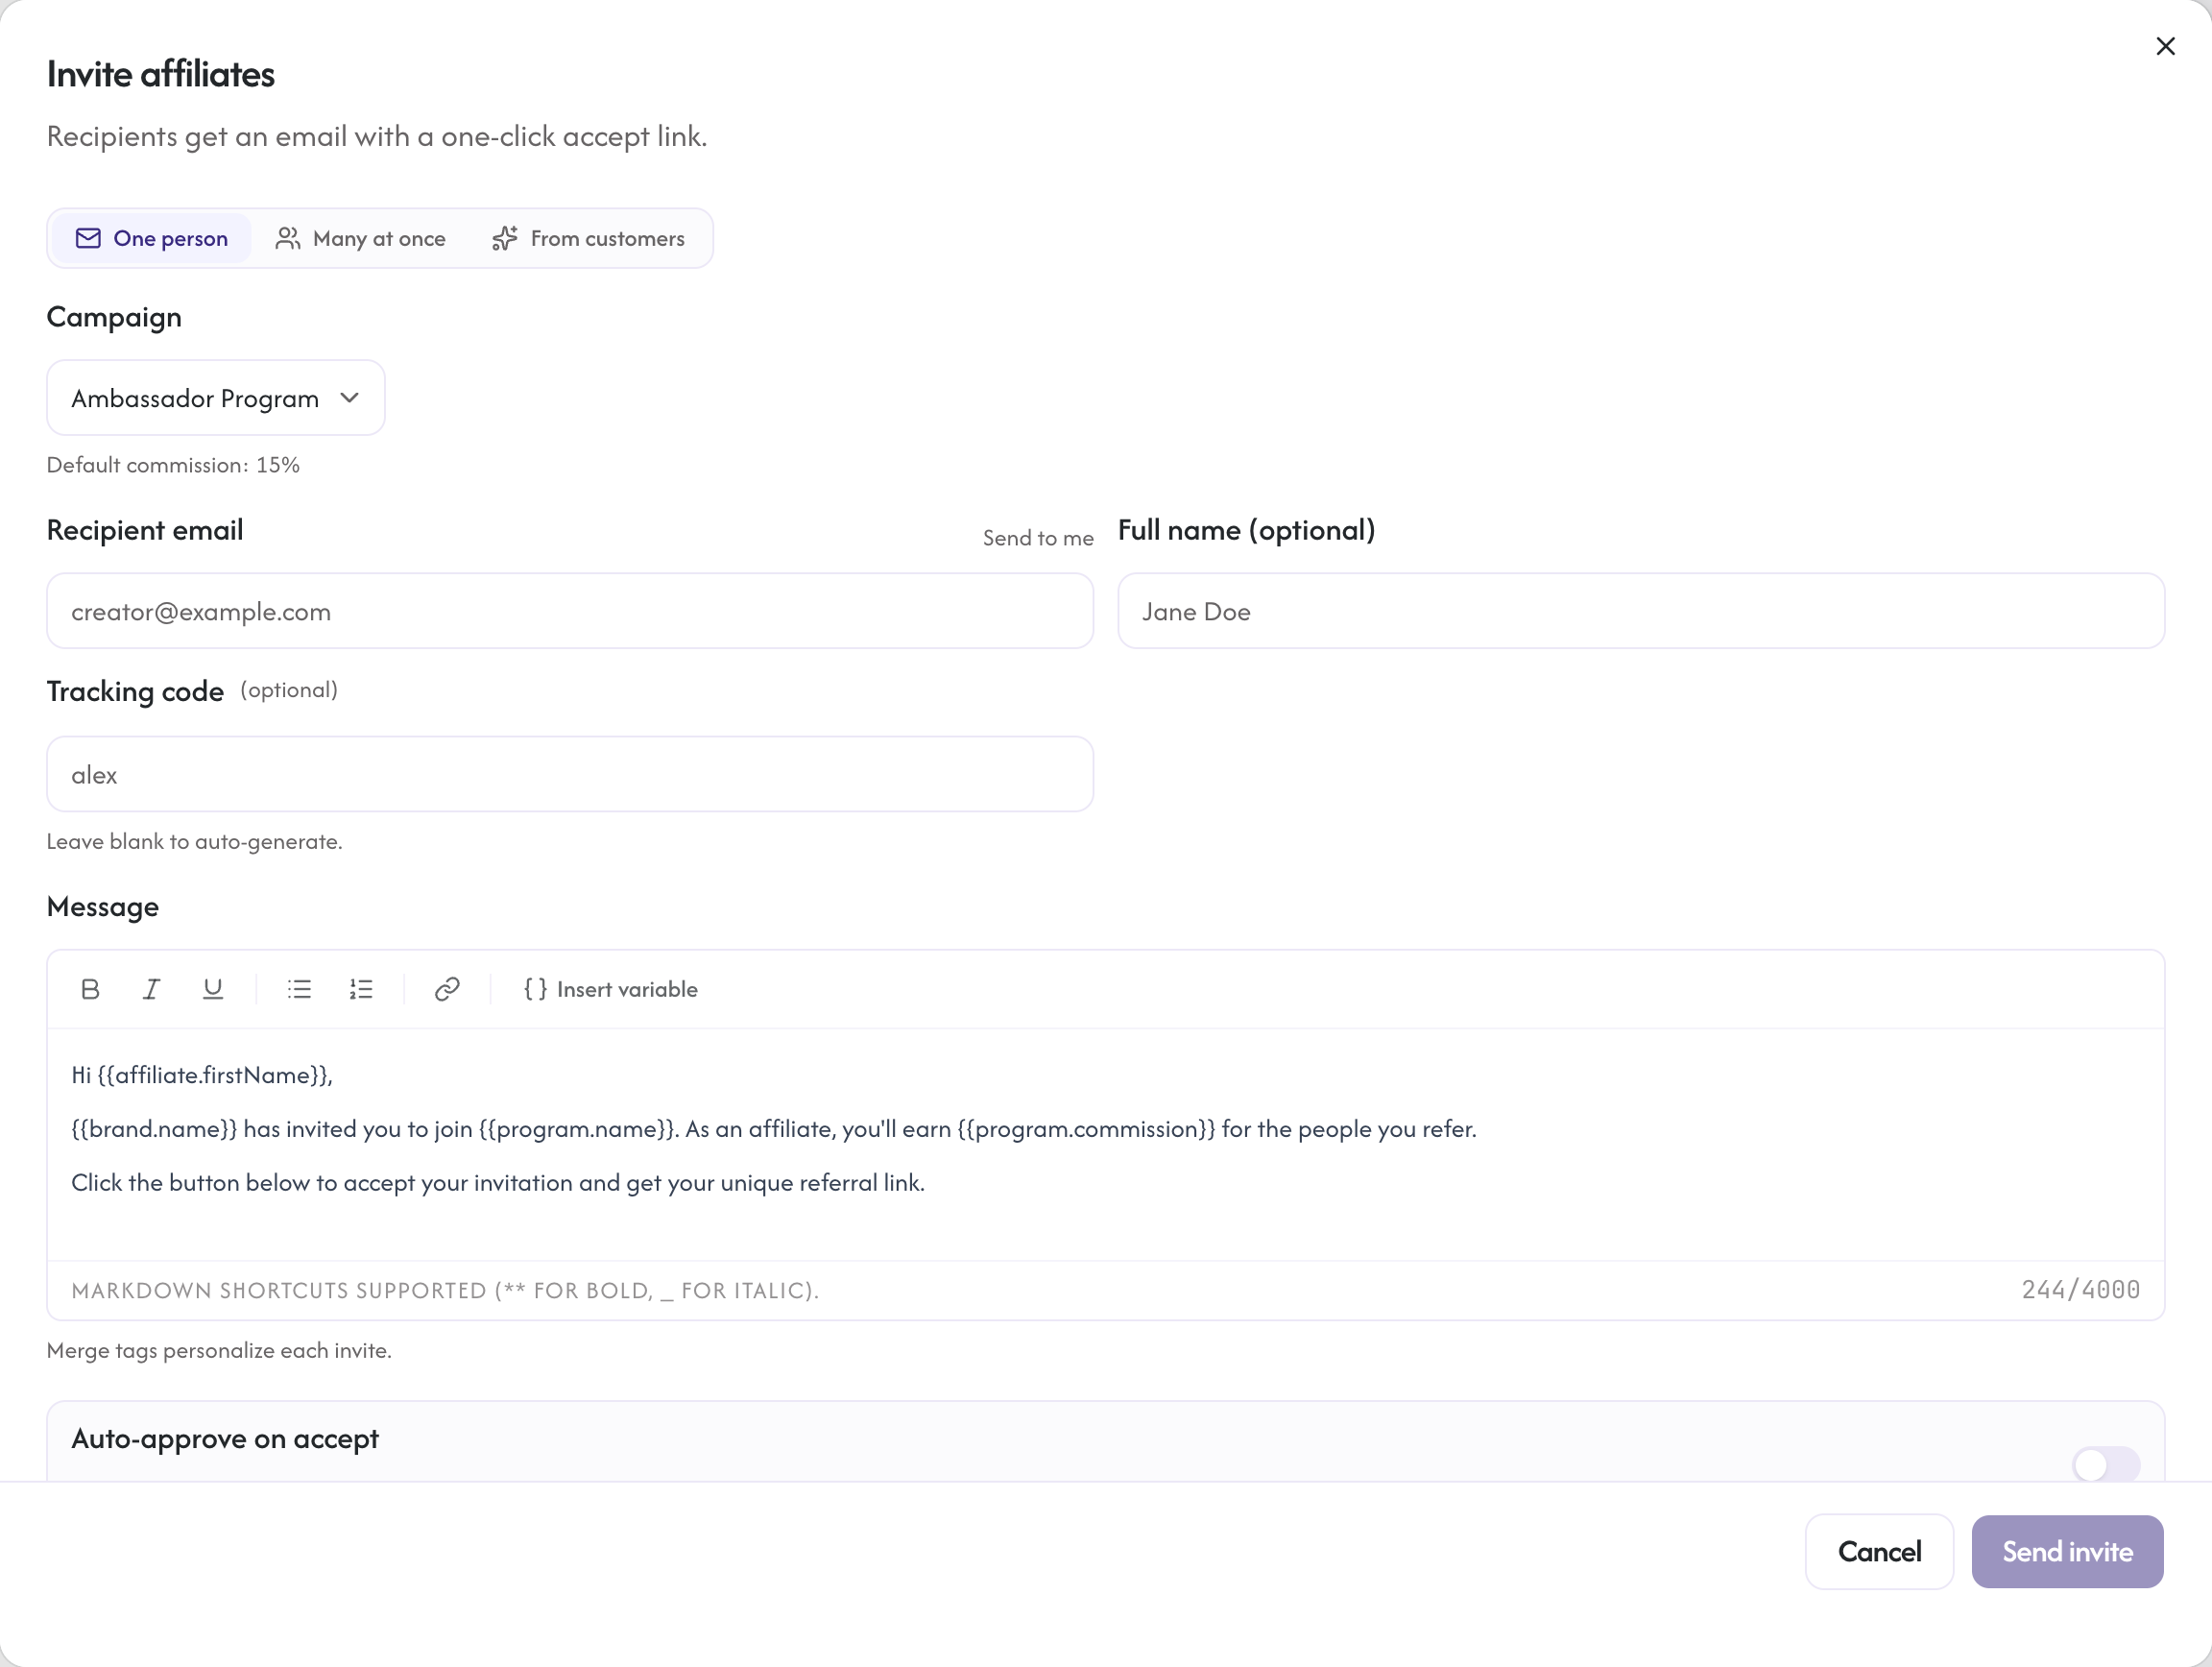
Each recipient gets a unique invite link at /invites/affiliate/{token}. Accepting the invite creates the affiliate as approved or pending, controlled by the modal's Auto-approve on accept toggle. The toggle defaults to whatever the selected campaign's auto-approve setting is.
Once the affiliate is approved (whether by auto-accept or by your subsequent approve action), they receive the same "Get your link" magic-link email as a public applicant. One click into /a. Invites expire after 7 days; you can resend or revoke pending invites from the Invites tab on /dashboard/affiliates.
3. Curated network match
You can apply your campaign to the Rekomi Network. The network is a vetted pool of creators who applied once to Rekomi and were approved as quality affiliates across multiple campaigns. Network creators see relevant campaigns in their dashboard and can apply with a pitch.
Apply your campaign to the network at /dashboard/network. Listing needs an active paid plan and a funding source for payouts on your account, and the campaign's network switch cannot be turned on, and says why, until both are in place (see Apply to the curated network). You fill in:
- ICP description (who is your ideal customer)
- Target affiliate profile (who is your ideal creator)
- Commission pitch (why creators should care)
- Support link (where creators get help)
- Press link (your latest coverage, useful for creator vetting)
- Notes (anything else)
A Rekomi curator reviews your application and either approves it (your campaign goes into the network surface) or rejects it with a written reason. Status flows: Submitted -> Approved or Rejected; while submitted, the listing shows as Pending approval. The rejection reason is visible inline, and revising and saving the listing resubmits it for a fresh review.
Once approved, creators see your campaign when they browse /a/network. They apply with a pitch; you approve or reject from your normal affiliates queue.
Bonus channel: your affiliates recruit for you
On every plan there is a fourth channel: sub-affiliate recruiting. Enable it per campaign and every approved affiliate gets a personal recruitment link to share. When someone they recruit closes a sale, the recruiter earns an override you set: a percent of the recruit's commission, capped at one recruiting level, never multi-level. Recruits keep their full rate; the override comes out of your margin. It turns your strongest affiliates into a recruitment channel that scales with the program instead of with your outreach time.
Which to use
- Just getting started? Open the public application page. Share it everywhere.
- Have a list of known creators? Send direct invites (single or a bulk paste of up to 50) with a personal note; invited creators skip the cold application step.
- Want scaled quality recruitment? Apply to the curated network. Be ready to pitch creators on why your product is worth promoting.
The three are not mutually exclusive. Most brands run all three in parallel.
Settings that affect recruitment
A few campaign settings change the recruitment experience:
autoApprove = true: applicants are approved on submit. Use this if you want zero friction and trust your audience.autoApprove = false: applicants enter a queue. Use this if you want a quality bar.termsUrl: link to your affiliate campaign terms. Shown on the public application page.description: your pitch. Keep it punchy. Two or three sentences works.